

How to build a nature-inspired rock solid foundation for your abstracted landscapes
If you're looking for some inspiration and a 'rock solid’ foundation for creating your next abstracted landscape, then look no further than Mother Nature. She will provide!
In this blog post, I'll show how nature's own resources can provide you with an abundance of building blocks for such paintings. The following steps will hopefully be a refreshing new way to look at your landscapes and provide you with some artistic license to experiment and take on 'abstract landscape' painting, all while drawing on the inspiration of nature.
GETTING STARTED
To begin, you will need the following:
A smartphone.
A4 paper/Sketch pad (or iPad).
Pencils/charcoal (for sketching a basic design).
A canvas or watercolour paper.
A handful of acrylic paints (plus black and white).
Some brushes.
Collage papers (although we won't be diving into preparing these in this exercise, as this is more about gaining inspiration for a new composition.)
Feel free to use the techniques you would normally employ for your own painting practice. For example, I love sketching with an iPad using Procreate and you could draw digitally too if you have those tools. I then transfer (roughly sketch) my design onto the canvas when I'm ready to paint.
The first step is to get out in nature and take some pictures with your phone as a reference source. Here are some photographs that I took while walking in a nearby rainforest. The camera's viewfinder makes finding a composition a little easier, but you shouldn't worry about this too much while snapping away. Just enjoy your field trip in nature!

SIMPLIFYING NATURE
It can feel a little overwhelming as a painter to know just where to start as we are surrounded by so much visual information in nature – colours, textures, patterns, shapes and so on. Sometimes what's needed to start painting your next masterpiece is just to simplify all the visual information into something more manageable, like a little 'roadmap' (or blueprint) before starting with the paints on your canvas.
Any painting, whether abstract, nonobjective or realistic, needs to have 'good bones' – a solid foundational 'understructure' that holds the piece together. If we were to look at our painting as a building site, the understructure is the point at which we'd be breaking ground and pouring the concrete foundations. And just like a building's foundations, what we do here will be largely unseen once we're finished, but is still hugely important.
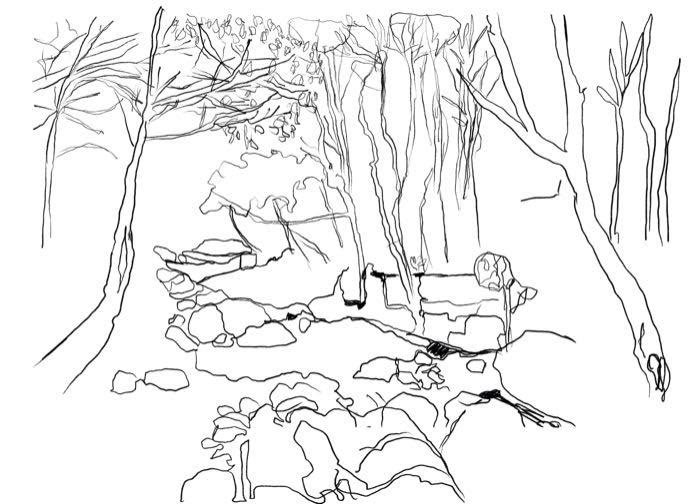
So, now it's time to get drawing! We don't need perfect drawings here because we are just breaking up the space for now. This simple sketch on a sheet of A4 paper (larger if you like), will act as the roadmap for your painting. It will also help you focus on what really matters as you paint, which is having fun while you get to tell your story in an interesting way through paint strokes (and perhaps collage or other techniques). Whether you sketch on a piece of paper or an iPad, you can roughly transfer this basic design to your canvas when you are ready to paint. Don't worry about being perfect!
FINDING TONAL BALANCE
I find it really helpful to go one step further and create what I call a 'tonal mud-map' to a drawing by roughly adding an assortment of lights, mediums and darks into the design. I did mine using an iPad (and I refer to this guide as I paint or collage).
You can add lights, mid-tones and darks by using paper and pencils, crayons or markers, etc or digitally. Creating some tonal contrast is a powerful tool to draw on for artists and I love the contrast of beautiful dark areas against the lightest of lights. I play with the placement of the lights, mediums and darks until I feel a sense of balance emerge. As you progress with your painting at every stage, you can keep referring to your little 'tonal mud-map' for hints about where to place your lights, mid-tones and darks. This will keep you focused on the tonal placement and balance of your design rather than getting preoccupied with the pretty colours that come later.
Keep in mind that this composition is very rough and will be ever-changing as I go along. Nothing is set in stone right now or at any point until your final layer of varnish is applied. This doesn't mean that you have to stick to this exact 'tonal mud-map' as you paint - painting is an intuitive process and you need to go with what unfolds on the canvas and respond to that one step at a time... I just use it as a reference source to glance at from time to time should I find myself getting a little off track and lost. I find it especially helpful if I need to add light or dark areas back into my artwork to bring back that feeling of blalnce. It's a lot like trying to work out a jigsaw puzzle!

HIT THE CANVAS
Once you are satisfied with your 'tonal mud-map', go ahead and sketch your design onto your canvas ready for the paint and collage. Keep your sketch super simple. I try to stick to a limited number of colours – no more than four or five. You can still get a huge family of saturated colours, tints, tones, shades and gorgeous greys from only a handful of single pigment paints. Trust me on this one!
Colour mixing is something I LOVE to teach and this powerful information can be a game-changer for artists because it helps artists understand how easily they can achieve an amazing family of connected, harmonious colours without spending too much money on expensive paints or ending up with a brown, muddy mess.
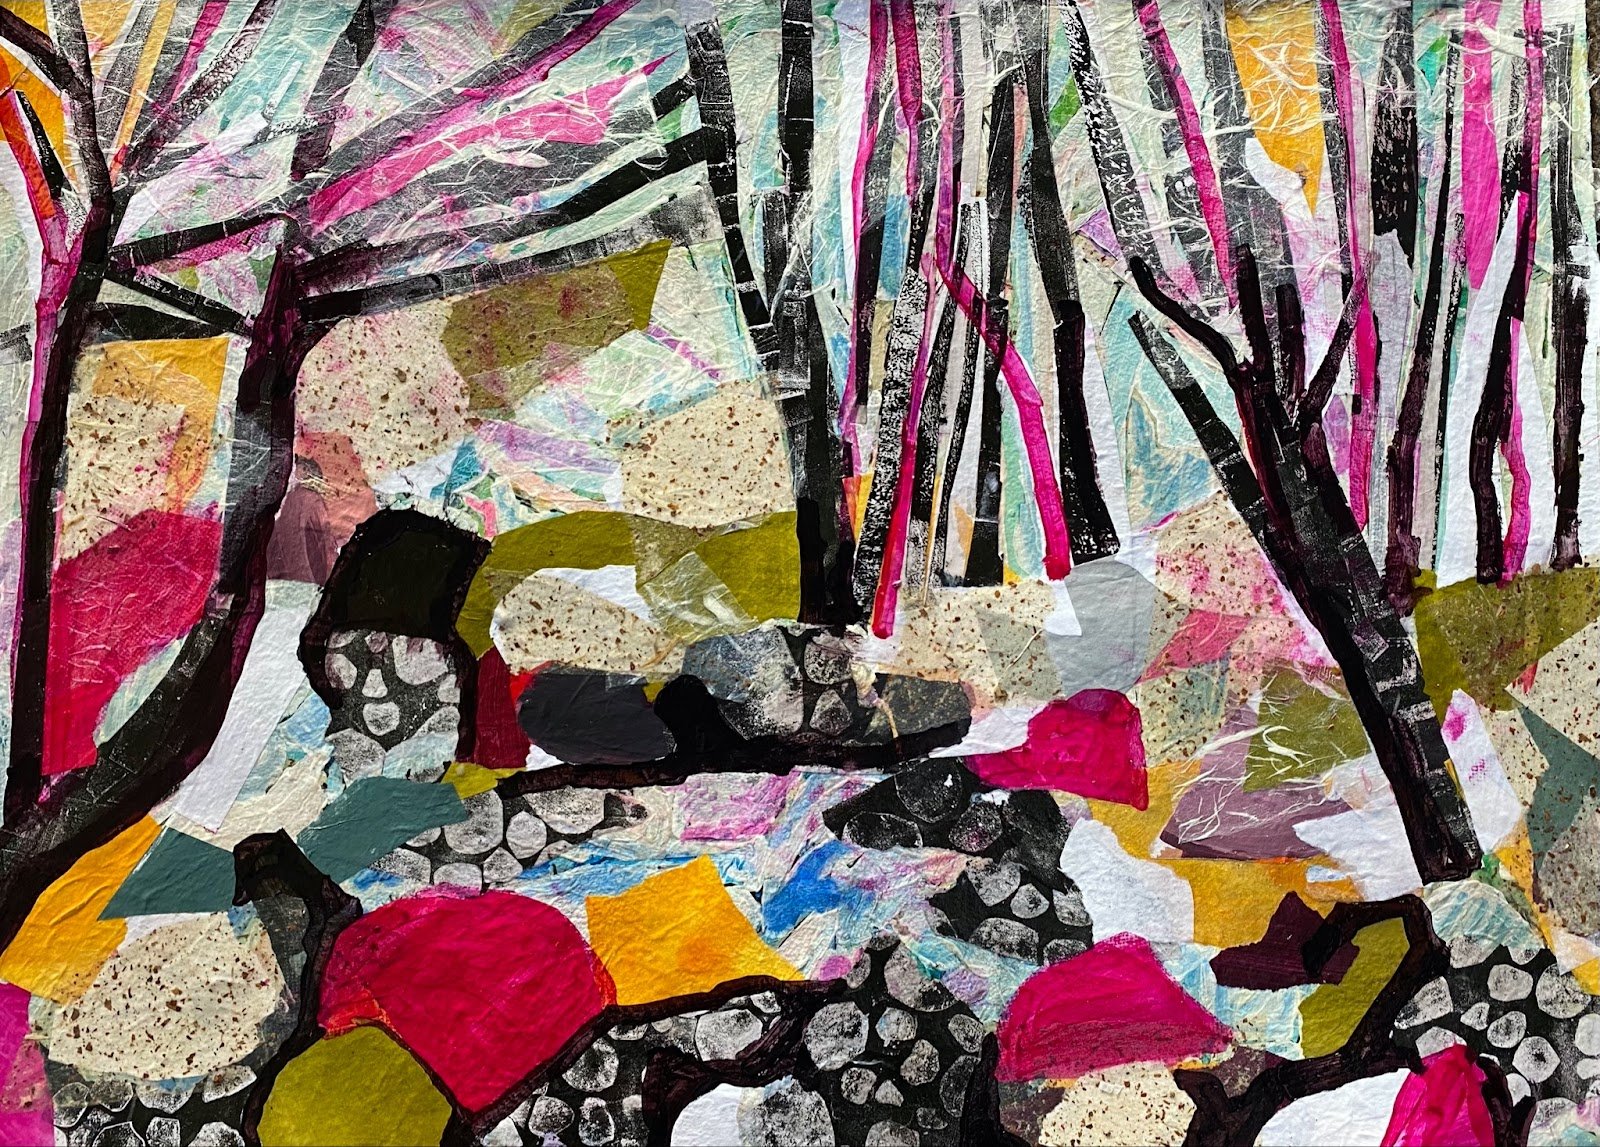
In this image, I've added the first layer of collage papers – an assortment of Japanese paper and hand-coloured collage papers. Notice my placement of lights, mediums and darks.
Now I'm ready to start painting...
I use the 'tonal mud-map' as a rough reference guide that allows me to relax and play a little more as I paint. You can see I've simplified the shapes and complexity of the collage shapes by adding blocks of more toned-down 'gorgeous greys' (pastels). I feel a little more satisfied with the 'bones' of my design now.
Once you are confident that your painting has good 'bones', you can relax and get playful. The fun bit is adding all the detail with collage pieces, paint and mark making to your heart's content.

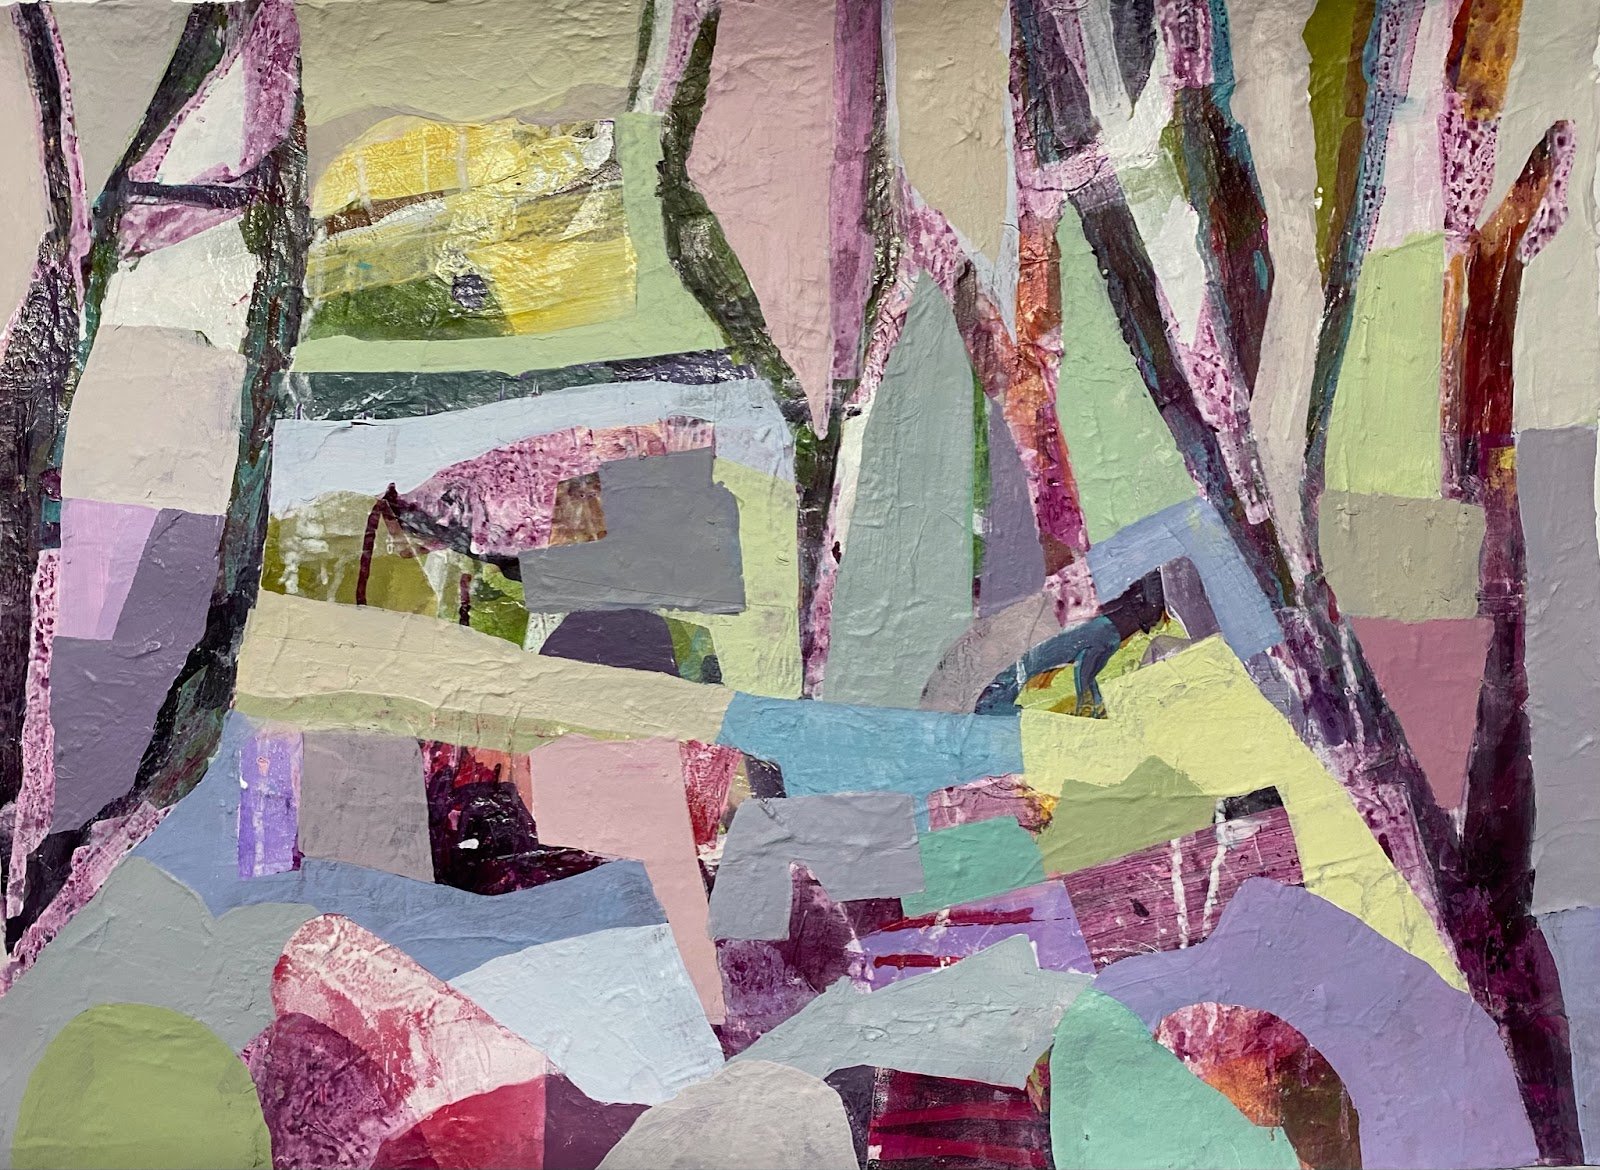
You can see in my final painting that I have retained some of the basic shapes and tonal contrast within the colours as I have progressed to a final result, but I have given myself plenty of artistic license to break away from the original concept drawing.
EMBRACING THE ART OF ‘PERFECTLY IMPERFECT’
Give yourself permission to play. This is where the magic happens! As I play with paint strokes there are moments that feel like the brush takes on a life of its own. If at first glance something doesn't seem right, don't be afraid to change things up or try out new ideas. Being brave allows us to explore new ground, make unexpected discoveries and develop new techniques.
If you start to notice yourself stuck in a section of your artwork, fiddling and fussing, take a break. Walk away from the canvas and start with fresh eyes another day. Just remember that wanting things to be perfect leads to great stress and takes us away from the joy of creativity!
After all, YOU are the artist and there is no rule book – you can change your mind as many times as needed. That's why I find mixed media so exciting. We add paint, collage etc and can take the paint away with a wet wipe (or rubbing alcohol if the paint has dried) should you change your mind. With collage you can move things around and find their happy place before committing that piece to the canvas with binder medium. Such freedom!
Last but not least, don't worry if the process takes longer than expected. If you need to spend days, weeks or even months on a painting then that's okay! Try to manage any unrealistic expectations and be kind to your inner artist as you would your own best friend. I have often gone back to old unresolved paintings and had an ah-ha moment that has given me a path forward to completion. The more you paint, the more your creative confidence blooms along the way.
Happy painting! And remember, if in doubt... simplify.
See you next time, with more Abstract Art ideas.
Until then, stay creative! :) xo Sharon
